| Compound | Form | Result |
| hook | (g h) y | y g (h y) |
| x (g h) y | x g (h y) | |
| fork | (f g h) y | (f y) g (h y) |
| x (f g h) y | (x f y) g (x h y) | |
| cap | ([: g h) y | g (h y) |
| x ([: g h) y | g (x h y) | |
| atop | u@v y | u (v y) |
| x u@v y | u (x v y) | |
| at | @: as atop, but infinite rank | |
| compose | u&v y | u (v y) NB. Same as atop(@) |
| x u&v y | (v x) u (v y) | |
| appose | &: as compose, but infinite rank | |
| under | u&.v y | vi u v y NB. vi is obverse (b. _1) of v |
| x u&.v y | vi (vx) u (v y) |
Very often you will need a random sample of a file. This is really handy to quickly prototype script, before you run it on a really large file. Or, if you are just doing some statistical analysis, it is very likely that you won’t even need to run it on the full file at all. Therefore, I generally create 10% and 1% samples of any large files that I am working with correctly. When using Windows I find this easiest to do using PowerShell. Here is the command that I use (replace the ’10’ with ‘100’ to get a 1% sample):
cat file.txt | ?{$_.ReadCount -eq 1 -or (Get-Random -max 10) -eq 1} > file_sample10.txt
I’ll be presenting an HBR Visualization Webinar tomorrow. For those interested in following along, here are the data files I’ll be using:
- Tourism Forecasting
- Predict Grant Applications
- R Package Recommendation
- RTA Freeway Travel Time
- Blue Book For Bulldozers
And here is some R code that we’ll use for the bulldozers data set:
setwd("C:\\YOUR_PATH_HERE")
df = read.csv("bulldozers.csv")
samp = df[sample(1:nrow(df), nrow(df)/10, replace=FALSE),]
summary(samp)
write.csv(samp, "bulldozers_samp.csv", row.names=F)

library(plyr)

appendNAs <- function(dataset) {
  append_these = data.frame( is.na(dataset[, names(dataset)] ) )
  names(append_these) = paste(names(append_these), "NA", sep = "_")
  append_these = colwise(identity, function(x) any(x))(append_these)
  dataset = cbind(dataset, append_these)
  dataset[is.na(dataset)] = -1000
  return(dataset)
}

samp2 = appendNAs(samp)
f0 = function(x) {
  if (nlevels(x)>32) {
    return (unclass(x))
  } else {
    return (x)
  }
}
samp2 = colwise(f0)(samp2)

library(randomForest)
m = randomForest(SalePrice~., data=samp2, ntree=15, sampsize=5000, nodesize=25, do.trace=T)
partialPlot(m, samp2, Enclosure)
partialPlot(m, samp2, ProductSize)
varImpPlot(m)
In my End to end web app in under an hour tutorial I have been using C# for the backend and SQL Server for the DB. What if you’d rather use something else? Easy! For example, here’s how to port what we’ve done in parts 1-4 to Python. We’ll use the handy Flask-Restless library to create the API, along with Flask-Sqlalchemy to handle ORM duties for us. We’ll use sqlite as our DB in development, since it’s easy to get up and running. You should switch to something more appropriate in production (such as postgresql), although I won’t be covering that here.
Creating the model
To start with, import the appropriate modules, create and configure your flask app (including selecting an appropriate path for your sqlite db), and create your Todo model class.
import flask
import flask.ext.sqlalchemy
import datetime

app = flask.Flask(__name__)
app.config['DEBUG'] = True
app.config['SQLALCHEMY_DATABASE_URI'] = 'sqlite:////tmp/test.db'
db = flask.ext.sqlalchemy.SQLAlchemy(app)

class TodoItem(db.Model):
    id = db.Column(db.Integer, primary_key=True)
    todo= db.Column(db.Unicode)
    priority = db.Column(db.SmallInteger)
    due_date = db.Column(db.Date)
Now you are ready to create your API endpoint.
import flask.ext.restless

db.create_all()
manager = flask.ext.restless.APIManager(app, flask_sqlalchemy_db=db)

manager.create_api(TodoItem,
    methods=['GET', 'POST', 'DELETE', 'PUT'], results_per_page=20)

app.run()
That’s all you need! Try running that, and go to /api/todo_item in your browser. (Note that flask-restless turns CamelCase class names into underscore_separated names). You may also want to prepopulate your table with some data. I’ll leave that for you to do before moving on to the next section.
Updating the controller
Flask-Restless uses a somewhat different format for both its request and its response. Therefore we have to modify a few things in our controller (templates and directives however should not need to change). I created the following method in my ListCtrl, in order to simplify creating a request in the format that Flask-Restless expects:
var make_query = function() {
    var q = {order_by: [{field: $scope.sort_order, direction: $scope.sort_desc ? "desc": "asc"}]};
    if ($scope.query) {
        q.filters = [{name: "todo", op: "like", val: "%" + $scope.query + "%"} ];
    }
    return angular.toJson(q);
}
I also modified $scope.search() to call make_query, and account for the different response format in Flask-Restless.
$scope.search = function () {
    var res = Todo.get(
        { page: $scope.page, q: make_query() },
        function () {
            $scope.no_more = res.page == res.total_pages;
            if (res.page==1) { $scope.todos=[]; }
            $scope.todos = $scope.todos.concat(res.objects);
        }
    );
};
Finally, I created a small method to call when creating the controller, or when changing sort order:
$scope.reset = function() {
    $scope.page = 1;
    $scope.search();
};
That’s basically all that is required to have this up-and-running in Python!
Here is the video tutorial that goes with this post:
Continued from Part 3.
Adding Indexes
Since we will probably sort frequently by the displayed columns, we should add indexes to them. However, our Todo column is currently unlimited in length, which will be tricky to index. So let’s first add an appropriate constraint in the TodoItem class:
[MaxLength(800)]
public String Todo { get; set; }
(NB: You’ll need “using System.ComponentModel.DataAnnotations” for this attribute.) Now run ‘Add-Migration CreateTodoIndexes’ in the console (where “CreateTodoIndexes” is the name of migration – use whatever name you prefer), and customize the Up() method to add the indexes.
public override void Up()
{
AlterColumn("dbo.TodoItems", "Todo", c => c.String(maxLength: 800));

foreach (string col in new[] { "Todo", "Priority", "DueDate" })
    CreateIndex("TodoItems", col);
}
Finally, run “Update-Database”, to make this changes in the DB. Now you’re truly web-scale!
Deploying to AppHarbor
Deployment is already very well covered by the docs at AppHarbor, so I’ll just summarize the steps here.
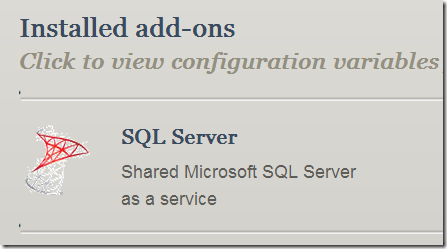
First, create a GitHub project and commit your code. Create an application at AppHarbor, and be sure to add the SQL Server add-on (20MB is free).
Connect your AppHarbor application and GitHub, by simply clicking the Configure Github link on your main AppHarbor project page.
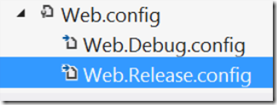
Now we need to configure the DB. Open web.config.release in the root of your project.
Paste in the following code:
<?xml version="1.0"?>
<configuration xmlns:xdt="http://schemas.microsoft.com/XML-Document-Transform">
  <connectionStrings>
    <add xdt:Transform="SetAttributes"
         xdt:Locator="Match(name)"
         name="AmazingTodoContext"
         connectionString="...paste..." />
  </connectionStrings>
</configuration>
You need to paste in the unique connection string provided by AppHarbor. You can get this by clicking ‘Configuration Variables’ by the list of AppHarbor addons, and clicking the copy button for the value of ‘SQLSERVER_CONNECTION_STRING’.
Finally, we need to ensure that Update-Database is called automatically as required, by adding this to the database context class (AmazingTodoContext):
protected override void OnModelCreating(DbModelBuilder modelBuilder) {
    Database.SetInitializer(
        new MigrateDatabaseToLatestVersion<AmazingTodoContext, Migrations.Configuration>());
}
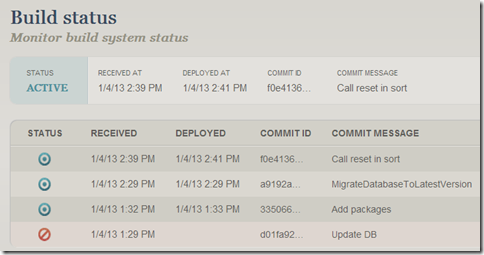
If you now commit to GitHub and sync, AppHarbor will be notified of the commit and will automatically build and deploy your application. Each time you commit a new build and deploy will be kicked off, and status is displayed in AppHarbor.
The Hostnames link shows you the hostname of your running app.
Click it (and add ‘index.html’ to the url) to see your stunning addition to internet commerce!
You can get the code as at the end of part 4 from this GitHub link. Don’t forget to set the connection string and also to update your local database if you want to run the code from GitHub, rather than creating it yourself using the tutorial.
In the next part we will add make the application more resilient, by adding error handling and validation.
Here is the video tutorial that goes with this post:
Continued from Part 2.
Create/Update
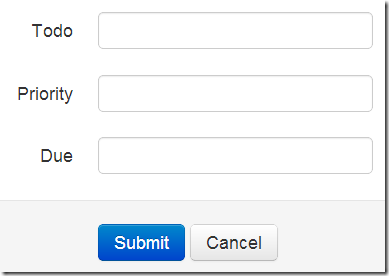
Let’s now create a form to add new items. Here’s the basic HTML:
<form name="form" class="form-horizontal">
<div class="control-group" ng-class="{error: form.Todo.$invalid}">
    <label class="control-label" for="Todo">Todo</label>
    <div class="controls">
        <input type="text" ng-model="item.Todo" id="Todo">
    </div>
</div>
<div class="form-actions">
    <button class="btn btn-primary">
        Submit
    </button>
    <a href="#/" class="btn">Cancel</a>
</div>
</form>
The ‘control-group’ div needs to be repeated for each item. This could be made easier by writing a directive, but you know how to do that yourself now… The ng-model is showing something new here – the ability to create properties of an object on-the-fly. In this case, an object called $scope.item is being created.
The Cancel button simply redirects to the ‘/’ template. Note that all AngularJS internal links must start with ‘#’, in order to stay within the same server page. We need to add a route to app.js to allow us to go to this page:
when('/new', { controller: CreateCtrl, templateUrl: 'detail.html' }).
Create an empty controller called CreateCtrl for now, and add a TH to list.html to allow us to jump to the create page.
<th><a href="#/new"><i class="icon-plus-sign"></i></a></th>
Check the new form displays correctly.
To make this actually do something useful, add ‘ng-click="save()"’ to the Submit button, and add your save method to CreateCtrl.
$scope.save = function () {
    Todo.save($scope.item, function() {
        $location.path('/');
    });
};
Hopefully the general approach to this method is familiar from our earlier use of query() – we pass a second parameter, which is a callback called on success. We really should add a third parameter: a callback called on failure. I’ll let you tackle that yourself. The good news is that our Create form is now fully working! In the future we will add validation and also use a date-picker to make it easier to pick a due date.
Edit Form
We can use the same template for the edit form. But we’ll need a new route and a new controller that captures and displays the item to edit. The route:
when('/edit/:itemId', { controller: EditCtrl, templateUrl: 'detail.html' }).
The controller needs to load the item when it initializes, and save to the appropriate id.
var EditCtrl = function ($scope, $routeParams, $location, Todo) {
$scope.item = Todo.get({ id: $routeParams.itemId });

$scope.save = function () {
    Todo.update({id: $scope.item.TodoItemId}, $scope.item, function () {
        $location.path('/');
    });
};
};
Note that we’ve added $routeParams to our parameters in order to grab the id we captured from the url (i.e. where ‘:itemId’ appears in the route). Finally, let’s add an edit link as the final TD to each row.
<td><a href="#/edit/{{item.TodoItemId}}">
        <i class="icon-edit"></i>
    </a></td>
That’s all we need – nice to see that we’re needing less and less code to add features; that’s a very good sign!
Delete
Our last major piece of functionality is deletions. Add a delete icon to our last TD that calls an appropriate method:
<a ng-click="delete()"><i class="icon-remove"></i></a>
And also add a unique id to the TR, so we can refer to it later.
id="item_{{item.TodoItemId}}"
Finally, add the delete() method to ListCtrl:
$scope.delete = function () {
    var itemId = this.item.TodoItemId;
    Todo.delete({ id: itemId }, function () {
        $("#item_" + itemId).fadeOut();
    });
};
I’ve used jQuery’s fadeOut() method here so that the user gets some feedback about the successful deletion. Strictly speaking, code that manipulates the DOM should really be in a directive, not a controller – but that seems like overkill for this single line.
It works!
So now we have a complete CRUD application. In the next part, we’ll learn how to add indexes using EF Migrations, and we’ll also learn how to make our app available to the public using AppHarbor. I hope you are ready for the fame and fortune that you will receive once your peers can use your amazing todo application!
Continued in Part 4.
Here is the video tutorial that goes with this post:
Continued from Part 1.
Search
Let’s add a basic search form to the top of list.html:
<form class="form-search">
    <div class="input-append">
        <input type="text" ng-model="query" class="input-medium search-query" placeholder="Search">
        <button ng-click="reset()" type="submit" class="btn"><i class="icon-search"></i></button>
    </div>
    <button ng-click="query=''; reset()" ng-disabled="!query" type="submit" class="btn">Reset</button>
</form>
“ng-model” is perhaps the most important and useful AngularJS directive: it creates a 2-way binding between a property in $scope and the value of an HTML element. In this case, our text box’s value is bound to $scope.query. Furthermore, the Reset button will be disabled automatically if $scope.query is empty, due to the use of the ng-disabled directive.
All we need now on the client side is to define $scope.reset() in our controller.
var ListCtrl = function ($scope, $location, Todo) {
    $scope.reset = function() {
        $scope.items = Todo.query({q: $scope.query});
    };

    $scope.reset();
};
Unfortunately, the query method that WebAPI creates for us does not support searching, sorting, or paginating. (Oddly enough, the pre-release versions of WebAPI did, but the functionality was stripped just before release!) Therefore, we will need to edit TodoController.cs to remove GetTodoItems(), and replace it with this:
public IEnumerable<TodoItem> GetTodoItems(string q = null, string sort = null, bool desc = false,
                                                        int? limit = null, int offset = 0) {
    var list = ((IObjectContextAdapter) db).ObjectContext.CreateObjectSet<TodoItem>();

    IQueryable<TodoItem> items = string.IsNullOrEmpty(sort) ? list.OrderBy(o=>o.Priority)
        : list.OrderBy(String.Format("it.{0} {1}", sort, desc ? "DESC" : "ASC"));

    if (!string.IsNullOrEmpty(q) && q != "undefined") items = items.Where(t => t.Todo.Contains(q));

    if (offset > 0) items = items.Skip(offset);
    if (limit.HasValue) items = items.Take(limit.Value);
    return items;
}
(Although we are not using sorting or pagination yet, we may as well include it in our method for later.) The optional parameters to the method are automatically mapped to the querystring by WebAPI – so e.g. index.html?q=something will pass ‘something’ as the value of the ‘q’ parameter. $scope.reset() sets this parameter to $scope.query. So, we now have working sort functionality!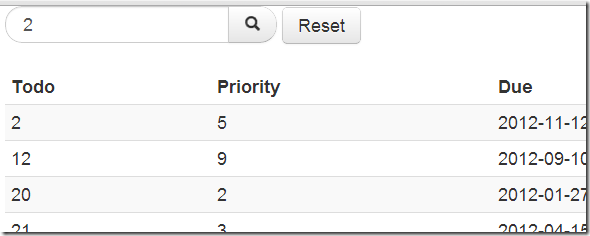
Pagination
Let’s now add pagination. That’s pretty simple actually. As you can see from GetTodoItems above, we can pass in an offset and a limit, so we just need to modify ListCtrl to only request 20 items at a time, and keep track of whether we have got all the items available (i.e. if we get less than 20 items in response, there is nothing more to retrieve). Note that we are now using the 2nd parameter to query(), which is a callback which is called on success. This allows us to append the additional items to the existing list.
$scope.search = function () {
    Todo.query({ q: $scope.query, limit: $scope.limit, offset: $scope.offset },
        function (items) {
            var cnt = items.length;
            $scope.no_more = cnt < 20;
            $scope.items = $scope.items.concat(items);
        }
    );
};

$scope.reset = function () {
    $scope.offset = 0;
    $scope.items = [];
    $scope.search();
};

$scope.show_more = function () { return !$scope.no_more; };

$scope.limit = 20;

$scope.reset();
That’s the entirety of the controller at this point. The only other thing we need is a link in details.html to grab another page of data.
<a href="" ng-click = "offset = offset + limit; search()"
    ng-show ="show_more()">Show more</a>
The ng-show directive ensures that this link will not be shown when there is no further data (when show_more() returns false).
Sorting
In order to allow sorting, we’ll need to store sort order and direction in $scope, and then add to the Todo.query() params: sort: $scope.sort_order, desc: $scope.sort_desc . After adding those two parameters, be sure to initialize the order to whatever you prefer as the default.
$scope.sort_order = 'Priority';
$scope.desc = false;
Let’s now add a sort_by function that sets sort_order to whatever it is passed, and toggles the direction if it is called multiple times with the same order.
$scope.sort_by = function (ord) {
    if ($scope.sort_order == ord) { $scope.sort_desc = !$scope.sort_desc; }
    else { $scope.sort_desc = false; }
    $scope.sort_order = ord;
    $scope.reset();
};
All we need to do now is to make the table header clickable.
<th><a ng-click="sort_by('Todo')">Todo</a></th>
Finally, let’s add an icon that is shown depending on whether we are sorting by that column – add this just before </th>:
<span ng-show="do_show(true, 'Todo')"><i class="icon-circle-arrow-down"></i></span>
<span ng-show="do_show(false, 'Todo')"><i class="icon-circle-arrow-up"></i></span>
and the required js method:
$scope.do_show = function (asc, col) {
    return (asc != $scope.sort_desc) && ($scope.sort_order == col);
};
Creating a directive
That’s quite a lot of HTML for each individual TH! Let’s simplify it by writing a ‘sorted’ directive. Once the directive is written, we’ll be able to write our header like this:
<th sorted="Todo">Todo</th>
To start our directive, call the appropriate method, and set the options to create a new $scope in the directive, and also to transclude the directive content:
TodoApp.directive('sorted', function() {
    return {
        scope: true,
        transclude: true,
Now we are ready to include our template, which is simply the contents of the TH we created for the Todo header, with a couple of minor changes.
template: '<a ng-click="do_sort()" ng-transclude></a>' +
    '<span ng-show="do_show(true)"><i class="icon-circle-arrow-down"></i></span>' +
    '<span ng-show="do_show(false)"><i class="icon-circle-arrow-up"></i></span>',
Here, the ng-transclude directive tells AngularJS where we want the contents of the element put (they are put immediately after the element containing this attribute).
Then, we can add a controller to the directive containing the logic we wrote earlier:
controller: function($scope, $element, $attrs) {
    $scope.sort = $attrs.sorted;

    $scope.do_sort = function() { $scope.sort_by($scope.sort); };

    $scope.do_show = function(asc) {
        return (asc != $scope.sort_desc) && ($scope.sort_order == $scope.sort);
    };
}
That’s it! We now have a list display that sorts searching, sorting, and pagination.
In the next part, we’ll take a look at creating, deleting, and updating items.
Continued in Part 3.
Here is the video tutorial that goes with this post:
Here’s how to create a complete web app in under an hour. We will (naturally!) create a todo app. The features:
- Create, update, delete a todo
- Sort (and show sort order)
- Search
- Pagination
We’ll try to make it somewhat user friendly, e.g.
- Date-picker widget for todo due date
- Enable/disable buttons as appropriate for context
Our infrastructure will be:
- Backend Language: C#
- Backend Framework: WebApi
- Database: SQL Server (including SQL Express LocalDB during development)
- ORM: Entity Framework Code First + Migrations
- Frontend Framework: AngularJS
- CSS styles: Bootstrap
- IDE: Visual Studio + Resharper
- Hosting: Appharbor
As you’ll see, this particular choice of tools is well suited to rapid application development, and is also very flexible.
The goal is not just to throw together the minimal necessary to have something working, but to create a really flexible infrastructure that we can use as a foundation for many future applications. OK, let’s get started.
The Backend
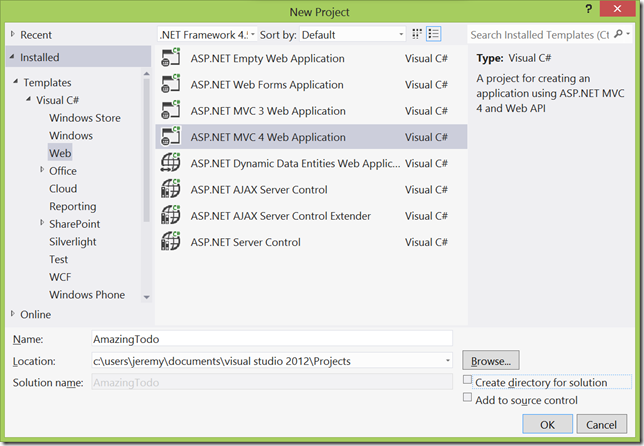
In Visual Studio, create a new document and choose to create an MVC web application project.
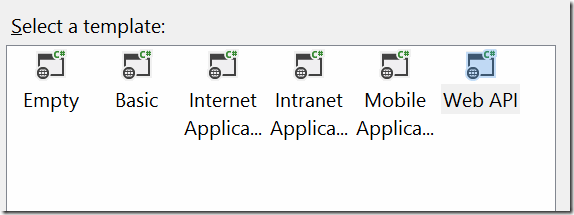
Use the web API template.
Web API is a framework which makes it easier to create REST APIs. It is very similar to ASP.net MVC.
Delete HomeController.cs, everything in the Content folder, and everything except Web.config in the Views folder. (These are all for using ASP.Net MVC views and default styles, none of which we’ll need).
By default the API will use XML, but we would prefer JSON (this makes it a little easier to debug), therefore add this to the end of WebApiConfig.Register():
config.Formatters.XmlFormatter.SupportedMediaTypes.Remove(
                config.Formatters.XmlFormatter.SupportedMediaTypes.FirstOrDefault(t => t.MediaType == "application/xml"));
Now, create a new class for your Todo Items:
public class TodoItem {
        public int TodoItemId { get; set; }
        public String Todo { get; set; }
        public byte Priority { get; set; }
        public DateTime? DueDate { get; set; }
    }
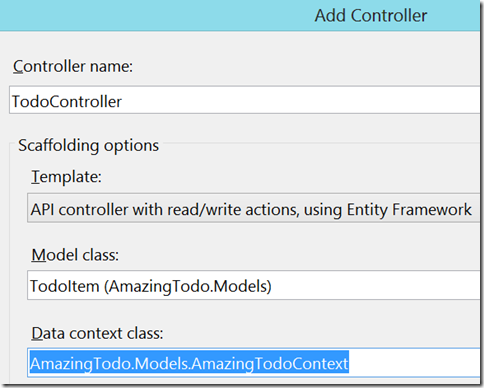
And now we’re ready to create our REST API! After compiling, right-click the Solution Explorer, and choose Add->Controller, and create a controller called TodoController.
You’ll need to choose the option to create a new data context.
You should now have a working REST API! Press F5 to run your solution, and it should open in a browser. You will get a “not found” error since we don’t have any pages set up yet, so you’ll need to modify the URL path to ‘/api/todo’.
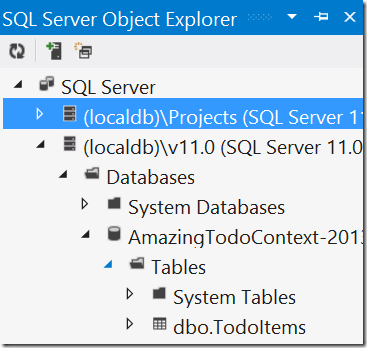
Of course, at this stage all we get is an empty array. We need to put some items into our database! First, check out SQL Server Object Browser to see that Visual Studio has already created a DB for us:
To add items, we are going to use Entity Framework Migrations. We will go to Tools->Library Package Manager in order to open the Package Manager Console, which is where we can enter commands to work with Entity Framework. In the console, type “Enable-Migrations”.
This has created a file for me called Configuration.cs, which allows me to specify data to seed my DB with. Let’s edit that now to seed some data.
protected override void Seed(AmazingTodoContext context) {
    var r = new Random();
    var items = Enumerable.Range(1, 50).Select(o => new TodoItem {
        DueDate = new DateTime(2012, r.Next(1, 12), r.Next(1, 28)),
        Priority = (byte)r.Next(10),
        Todo = o.ToString()
    }).ToArray();
    context.TodoItems.AddOrUpdate(item => new { item.Todo }, items);
}
Any time I change my model or edit Seed(), I’ll need to run Update-Database in Package Manager Console to have the DB show my changes to the code.
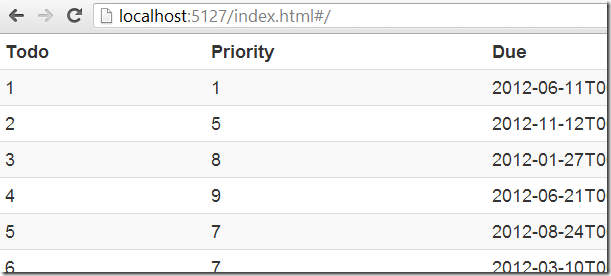
Now I’ll refresh my browser to see the data via the REST API:
The Basic AngularJS setup
Now that the API is working, we can create a simple page to show a list of todos. We will use AngularJS as our Javascript MVC framework, so let’s install that: simply type “Install-Package angularjs” at the package manager console. We’ll be using Bootstrap to style things up, so install that too: “Install-Package Twitter.Bootstrap”. In the root of your project, create index.html, with references to the css and js files we’ll be using.
<!DOCTYPE html>
<html ng-app="TodoApp" xmlns="http://www.w3.org/1999/xhtml">
    <head>
        <script src="Scripts/jquery-1.7.1.js"></script>
        <script src="Scripts/angular.js"></script>
        <script src="Scripts/angular-resource.js"></script>
        <link rel="stylesheet" type="text/css" href="Content/bootstrap.css" />
        <title>Amazing Todo</title>
    </head>
    <body>
        <div class="container">
            <div ng-view></div>
        </div>
    </body>
</html>
You will need to change the ng-app attribute in the html element, and the title, for each of your projects. Other than that, your index.html will be the same for most of your projects (other that having some different js and css links, of course). All the actual work will occur in AngularJS templates. In order for AngularJS To know what template and controller to use we need to set up some routes. To do this, we use the config method of the AngularJS module class. Let’s create a new JavaScript file for our AngularJS code; the convention is to call this app.js.
var TodoApp = angular.module("TodoApp", ["ngResource"]).
    config(function($routeProvider) {
        $routeProvider.
            when('/', { controller: ListCtrl, templateUrl: 'list.html' }).
            otherwise({ redirectTo: '/' });
    });
This creates a route for ‘/’ that uses a controller called ListCtrl and a template called list.html.
Let’s create an empty controller in app.js.
var ListCtrl = function($scope, $location) {
    $scope.test = "testing";
};
Let’s create a basic list.html as well.
<h1>Test {{test}}</h1>
Any properties and methods of $scope are made available automatically in the template. In the template, use ‘handlebars’ (double braces) to indicate where AngularJS expressions should be placed. Don’t forget to add a script element to index.html pointing at your app.js. Now try going to http://localhost:5127/index.html in your browser (you’ll need to change the port of course). If it’s working, you’ll see “Test testing”.
The List Page
Let’s edit our list.html to do something more useful!
<table class="table table-striped table-condensed table-hover">
    <thead>
        <th>Todo</th>
        <th>Priority</th>
        <th>Due</th>
    </thead>
    <tbody>
        <tr ng-repeat="item in items">
            <td>{{item.Todo}}</td>
            <td>{{item.Priority}}</td>
            <td>{{item.DueDate}}</td>
        </tr>
    </tbody>
</table>
For this to do anything, we will need $scope.items to contain our todos. We can define in app.js an AngularJS $resource that we can use to query our REST API.
TodoApp.factory('Todo', function($resource) {
    return $resource('/api/todo/:id', { id: '@id' }, { update: { method: 'PUT' } });
});

var ListCtrl = function ($scope, $location, Todo) {
    $scope.items = Todo.query();
};
$resource is a function provided by AngularJS that creates an object for accessing a REST API. We use a factory method so that we can reuse the object without it getting recreated every time. Note that we also had to add a parameter to ListCtrl in order to have access to this object.
At this point, you should be able to view the list in your browser.
It’s interesting to note that all the html files are entirely static – the only thing that’s dynamic is the JSON sent by the web API.
That’s the end of Part 1 of this walkthrough. In the next part, we’ll add sorting, searching, and pagination to the list.
Continued in Part 2.
The Kaggle web site needs to send emails from time to time – for example when confirming new users’ email addresses. Sending directly from a web server is not generally a good idea; even if you’ve taken the steps to set up DKIM, senderid, etc, you still have the problem that your IP isn’t a reputed email sender. It’s also likely that at some point some bad apple on your IP block will ruin the reputation for all their neighbors.
So instead, I decided to use a mail sending service. Here’s some examples, along with their pricing for their cheapest account:
- Postmark: $15 / 10,000 messages
- Socketlabs: $40/month (max 10,000 messages)
- Mailgun:
- SMTP.com: $27/month (max 10,000 messages)
Wo. That seems like a lot. Is it really so hard to send mail? Actually, no. Here’s a crazy option:
- FastMail: $3/month (max 2,000 messages per hour –That’s up to 1,500,000 per month!)
And BTW that FastMail option also gives you a bunch of other stuff you may find useful (e.g. host and manage 50 domains, 2GB file storage, 10GB IMAP storage…)
I founded FastMail back in 1999 (I sold it to Opera a couple of years back and don’t work there any more) and worked hard to make the infrastructure efficient. However I’m surprised that folks building much more focussed tools today aren’t able to do it much cheaper. I know the focussed tools I’ve listed have some extra features (such as an HTTP API), but I don’t see why that should increase the unit price substantially.
What do you think is the reason for this difference?
I enjoyed listening to Kaggle’s chairman, Nick Gruen, interview by James O’Loughlin on ABC radio. Here’s the full interview, in which Nick discusses the power of predictive modelling, the amazing results achieved by data mining competitions, and the upcoming $3m Heritage Health Prize.
Click the triangle below to listen.

